Showing posts with label workspace. Show all posts

Monday, May 11, 2015

Wood turning.....the beginning

 So back to the story....

My Snowman
The following month I went to a community hall about 20 minutes from me and had a fantastic time. I watched the club chairman turn an adorable little snowman before being let loose on a small lathe to make my own. Sure that it was unlikely that my piece would look even remotely snowman-like I had a go anyway and was so pleased when at the end of the night I went home with a little piece of sycamore that ACTUALLY looked like a snowman. He spend the next six weeks on display before being packed away with the rest of the ornaments for next year. I haven't missed missed a meeting yet (2 each month).

Santa must have decided that with all the turmoil lately that I deserved a nice present and brought me a lathe for Christmas. Yes, my own lathe. Not a big one of course (I have to be able lift the darn thing) but an entry level one perfect for someone starting out. An Amazon gift card bought me a starter set of tools and off I went.

I had an awful lot to learn.

With monthly demonstration and hands on evenings I got better at handling the tools and I made a few other little things but at home I tended to spend too long watching turning videos on Youtube and not actually much time on my lathe, partly due to a lack of a suitable bench to put my lathe on.


My Lathe Station
This all changed when a new member to the wood turning group I attend, just so happened to live quite literally around the corner from me AND I found an abandoned, heavy duty bookcase at the bus stop 20/30 feet from my front door in the same week.  Now I had a sturdy lathe station with storage beneath the lathe and a buddy who wants to learn to turn too. G has a more comprehensive workshop where I can use the band saw to prepare wood quickly and also he has a good supply of hardwood scraps from local joiners which he was happy to share meaning I didn't need to worry about ruining the few nice pieces I had.


Inspired by Japanese rice bowl
My first visit to G's workshop I started work on my first ever bowl. Sadly once I got it home I decided to refine a surface I had already finished and it did not end well. With a bang the bowl exploded sending pieces of Sapele everywhere. Thankfully a few days earlier I had invested in an full face shield which saved my left face from disaster (I wear glasses so eyes were safe). I swear never to turn without my face shield! The guy on Youtube is right, goggles are not enough. Those bowl shards had sharp edges and could have done some damage.


First Completed Bowl
Undeterred I chucked up another blank (from G) and completed my first bowl. It was not perfect by any means but it was mine and I was proud of it.

There are a few other things I have turned for practise, a tool handle, a mallet handle for a 100% recycled mallet for guide camp this summer, a couple of mushrooms (a lathe staple) and a failed honey dipper (half my fault, half the wood grain was too course) but you didn't come here to read about full sized items did you?!?

I had pinned many mini turnings on pinterest, some simple, some definitely not simple. On my last trip to G's workshop I had dug around in the bin for the bits left over when you cut a circle out of a square on the band saw for a bowl. The pieces in the corner were cut into small blocks (1" square by 2 inches long) and they came home with me. Later that week I had been working on some normal sized items and after the honey dipper I decided to try something small

......as in dolls house small.

To be continued

Kim

Thursday, January 10, 2013

Further Workspace update and the last of the cats.

Good evening all

So after a few more days of work on the desk area (it has been neglected for several years) the desk is now re-oriented but the top surface is still covered. A lot of other items in the house need to leave, move or be added before any real progress can be made and that will have to wait till finances allow. I will continue to work on the shelves above, on my bookcase and also upstairs and will return to the workspace with a guided tour when it is truly complete.My PC has gone but J's is "borrowing" some space from under my desk.


And to introduce the last of the bosses cats of the house, I bring you Loki. He is little younger than Freaya at around 7 and is also a rescue cat. He is also slightly evil. Not too much you understand, just the right amount of evil. The amount of evil that will steal the prawn right off the top of your ebi nigiri when given the chance. Also not the sharpest tool in the drawer. Madly in love with Freaya despite the fact she would gladly never see him again. Actually, if he left she would have no-one to give her daily beatings to. So instead he spends all of his time with Astrilde and are sometimes referred to as the opposite twins, black/white good/evil and yet such good friends.

My legs are under this cat

ALSO........this means I am going to start working on some actual miniatures, which will give me something relevant to blog about and hopefuly make some new mini friends.

Till next time, Kim.

Thursday, January 03, 2013

The Workspace Make-over

Whilst I have been out of crafting condition my desk has become something of a dumping ground,  more like a bomb range after a visit from the Mythbusters crew than a creative space.

Also it was put there over a decade ago for university to house my desktop PC and its CRT screen. Now I am a laptop kinda girl, and in winter it is rare to find me too far from the fireplace where it is warm. That is another reason it is such a state.

All after shots need a before for comparison. So here it is, my desk area at its worst. (Note J's mostly tidy desk behind)


Now I am happy to admit that this is such a mess that you cannot actually see my desk, hence why I called it my desk area. what you have is a standard (melamine coated) chipboard desk, the PC tower has a cubby to the right of the monitor with a small drawer above and a wide leg at the other end. Between those two supports is a roll out keyboard shelf from the days when the monitor took up the whole desk. The desk stands at a right angle to the alcove so it projects kinda far into the room. The little space on the left has a mini bookcase in it that matches the desk. This shot also includes the folding dining table and a rescue bookcase which seem to have sucked in by the gravitational force of that much junk.

More pictures of my shame


The plan is...... get ALL the stuff out. PC will be stored upstairs in the event of a laptop failure, that will free up a lot of space. The dining table will bo back to its intended location once freed up, it currently houses the christmas tree. Bookcase.......to be decided.

The new desk will consist of.....
  •  The existing desktop, cut to fit inthe alcove (parallel, not at a right angle) held on four 2x4 legs with stabilizing cross pieces, most of this can and will be cut from scraps of the current desk.
 Beneath this...
  •  3 sets of metal office drawers on casters courtesy of Ikea (when finances allow, inferior plastic ones I already have until then.
  • At the back of the desktop surface, small diy drawers for my most frequently used small items.
  • Pots of pens/paintbrushes will sit on top of there with any items that are drying or being photographed
Please excuse the plan sketch being photographed, the scanner refuses to scan because it has no cyan ink. (!?!?!?!?!?) Also it was drawn on the back of an activity sheet in McDonalds this afternoon.

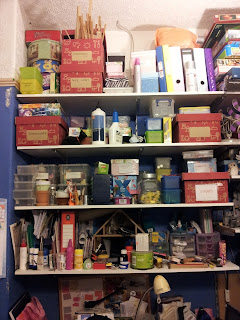
The shelving above will be reconfigured to house items one deep so that no box is behind or below another, this will likely bring the shelves closer together and extra shelves (not as deep) will be added at the bottom (not as deep so I don't knock myself out on them.)

Lighting will consist of 2 anglepoise type lights which can be used together to give shadowless (almost) light for photography.

Let the sorting begin......Until next time.